Step 1
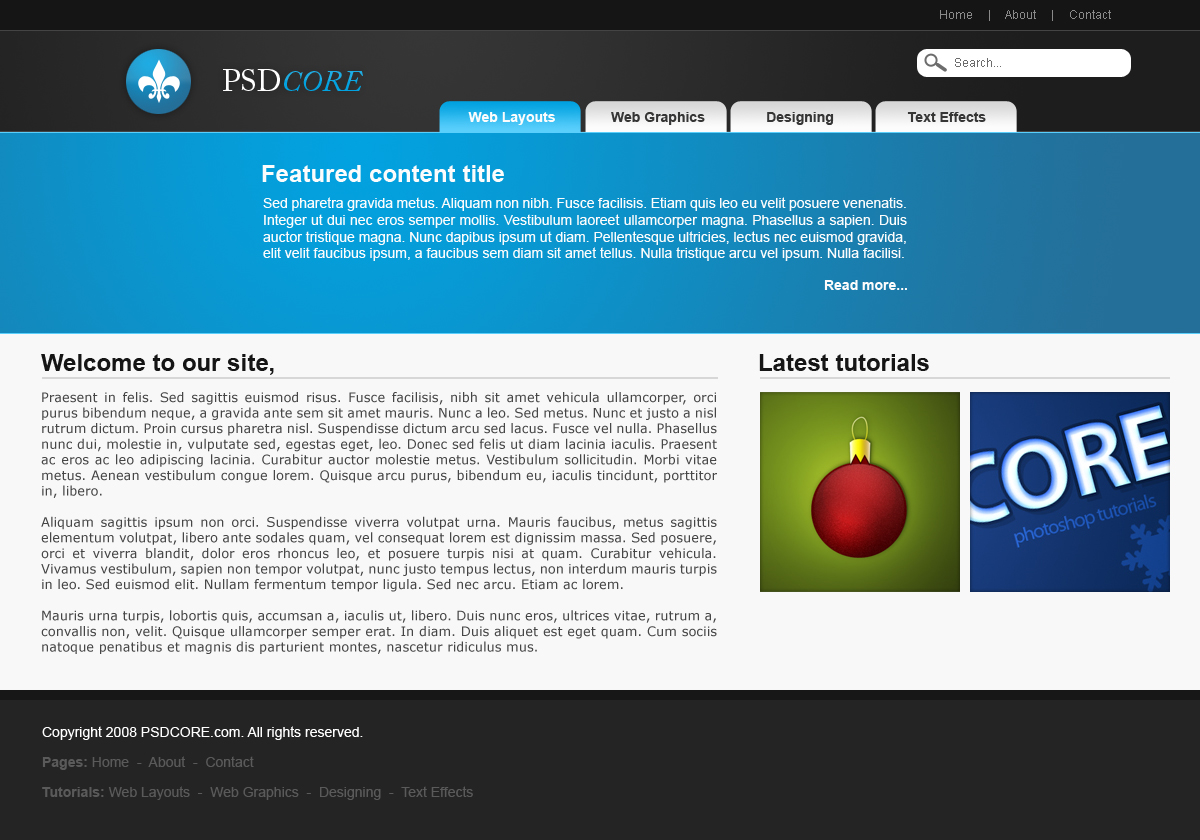
Firstly we need to create a new document, the size I have chosen is 1200 pixels by 840 pixels because it is big enough and when halved it fits nicely on PSDCORE. Fill the background with the colour #f7f7f7.

Step 2
There are going to be quite a number of layers in this tutorial, so I suggest that you label them and sort them into groups. Firstly create a new layer and make a selection of 1200 by 30 pixels at the top of the document and fill with the colour #151515.

Step 3
Using the text tool add in some text links in the top right corner. The font I’ve used is Arial, and the colour #8a8a8a. If you can’t see this text very clearly or other parts of the layout, go down to the bottom and go to the full size view.

Step 4
On a new layer make a selection of 1200 by 100 pixels underneath the top (and one pixel down). Fill the selection with a radial gradient using the two colours #353535 and #1d1d1d.

Step 5
Apply this stroke by going Layer > Layer Style > Stroke.

Step 6
On a new layer add in your logo or just create a simple one. I’ve made a circle with the elliptical marquee tool and filled it with a radial gradient using the two colours #02a2e0 and #246f99. There is also a simple gradient overlay and outer glow.

Using the custom shape tool I’ve also added a little white shape in there.

Select the text tool again and type in the name of your site. The font I’ve used is Adobe Caslon Pro and applied the same two layer styles as the logo.

Step 7
Now we are going to be adding a search box on the right hand side, on a new layer select the rounded rectangle tool and set the radius to 10 pixels. Make a shape (fill colour white – #ffffff) like the one below.

Add some text like ‘Search…’ to the box. The font is Arial and colour #6c6c6c.

Using the custom shape tool again make a magnifying glass icon on the left of the text using the same colour – #6c6c6c.

Step 8
Next up is the navigation buttons for the categories. Create a new layer and select the rounded rectangle tool (still at 10 pixel radius) and make a selection with the two curved corners on the top of the background and the bottom below. Fill this selection with a gradient from #02a2e0 to #5acffc using the gradient tool set to linear.

Select the area of the background behind the logo (Ctrl + Click the layer’s icon) and invert selection (Ctrl + Shift + I) and delete it (delete key on your keyboard). This leaves just the top part of the button – the part we want.

Using the text tool add in some text. The font here is Arial again and the colour is white.

Repeat this process for a button beside it – this time the gradient is from #d7d7d7 to #fcfcfc and the colour of the text is #2f2f2f.

Now you can either repeat the process again a couple of times for the other buttons or just duplicate the layers and move them across (the short cut to duplicate a layer is Ctrl + J).

Step 9
We are now going to be adding a featured content section – so it needs a background that stands out. Create a new layer and make a selection of 1200 by 200 pixels – again with a one pixel gap. Fill this selection with a radial gradient using the two colours #02a2e0 and #246f99.

Step 10
Apply a stroke to this featured content background. You can adjust layer styles for a layer by right clicking it (in the layers window) and going blending options. This gives it a little highlight which makes the background stand out that little bit more.

Step 11
Add in some text for the featured content area. Go grab some dummy text from lipsum.com if you do not have anything to stick there yet just to make it look more complete. The font is again Arial and white.

Step 12
Now that we have finshed the header we can begin on the content. Add a couple of bold titles using the colour #151515.

Step 13
On a new layer make a selection using the rectangular marquee tool a couple of pixels high under each title and fill with the colour #d7d7d7.

Step 14
Add in some dummy text and images. The font is Arial and colour #464646.

Step 15
Our last task is the footer, on a new layer make a selection 1200 pixels wide and 140 pixels high at the bottom of the document and fill with the colour #242424.

Step 16
Apply this stroke to the footer.

Step 17
Last of all, chuck in some copyright details and links to your pages. The font here is Arial, and the colours are white and #5a5a5a. Now continue this tutorial by coding it up into css & html in this tutorial. If you are looking for a way to display your web layout, Network Solutions offers domain registrationservices as well as hosting for website owners. Check them out when you’re ready to start a website for your own business or organization.
No comments:
Post a Comment